

How to Mix and Master in Logic Pro X Guide 2026
Creating a great song doesn’t end after recording your vocals or instruments. To make your music sound professional, you need to understand how to mix and master in Logic Pro X. These two stages shape the final sound of your track, making it clearer, louder, and ready for streaming platforms like Spotify, Apple Music, and YouTube.
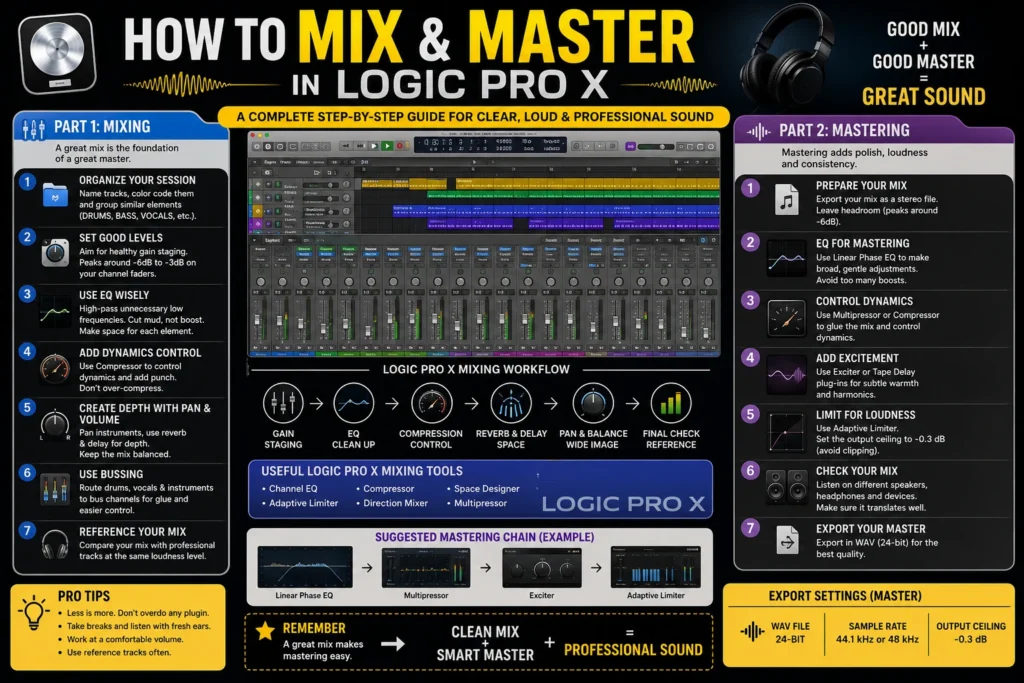
The good news is that Logic Pro X already includes professional mixing and mastering tools. You don’t need expensive third-party plugins to produce high-quality music. With the built-in EQ, Compressor, Channel Strip, Space Designer, Adaptive Limiter, and other effects, you can achieve excellent results directly inside Logic Pro X.
Whether you’re recording your first song or improving your production skills, this guide explains everything in simple English with practical examples.
What Is Mixing?
Mixing is the process of combining all the individual tracks in your project into one balanced song. Every instrument and vocal should have its own space without covering up other sounds.
During mixing, you’ll adjust:
- Volume
- EQ
- Compression
- Panning
- Reverb
- Delay
- Automation
- Stereo width
The goal is to create a mix that sounds clean, balanced, and enjoyable on different devices.
What Is Mastering?
Mastering is the final stage before releasing your music.
After your mix is complete, mastering enhances the entire song by improving loudness, tonal balance, and consistency while making sure it translates well on headphones, speakers, cars, and streaming platforms.
Think of it this way:
| Mixing | Mastering |
|---|---|
| Works on individual tracks | Works on the entire song |
| Balances vocals and instruments | Improves the finished mix |
| Uses EQ, compression, effects | Uses subtle processing and limiting |
| Happens before export | Final step before release |
Why Logic Pro X Is Great for Mixing and Mastering
Logic Pro X is one of the most complete digital audio workstations (DAWs) available. It includes everything most producers need without requiring extra software.
Built-in tools include:
- Channel EQ
- Compressor
- Adaptive Limiter
- Multipressor
- Space Designer
- ChromaVerb
- Delay Designer
- Stereo Spread
- Match EQ
- Loudness Meter
These tools are used by beginners and professional producers alike.
Before You Start Mixing
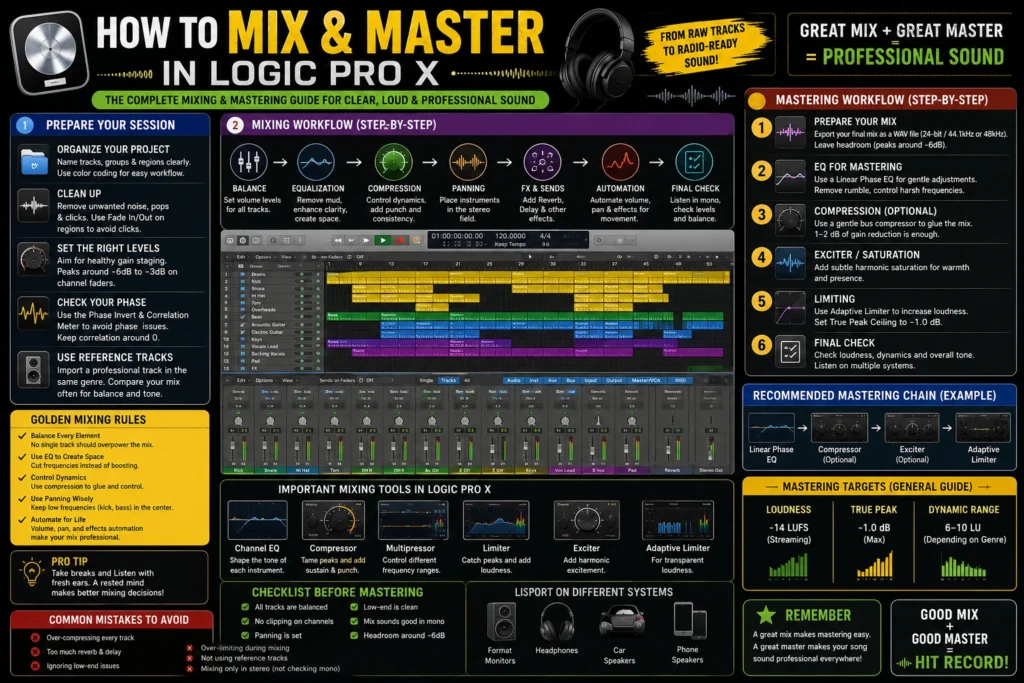
Good preparation saves time and improves your final results.
Organize Your Session
Before adding plugins:
Rename Every Track
Instead of names like “Audio 1” or “Track 5,” use clear labels:
- Lead Vocal
- Kick
- Snare
- Bass
- Piano
- Guitar
Color-Code Tracks
Grouping instruments by color helps you navigate large projects quickly.
Example:
| Color | Instrument Group |
|---|---|
| Blue | Drums |
| Green | Bass |
| Yellow | Guitars |
| Purple | Vocals |
| Orange | Keyboards |
Remove Unwanted Audio
Delete empty recordings, background noise, and unused takes to keep your project clean.
Step 1: Set the Right Volume Levels
The volume fader is your most important mixing tool.
Before adding EQ or compression, balance your tracks using only the faders.
A simple starting point looks like this:
| Instrument | Priority |
|---|---|
| Lead Vocal | Highest |
| Kick Drum | High |
| Snare | High |
| Bass | High |
| Guitar | Medium |
| Piano | Medium |
| Pads | Low |
| Effects | Lowest |
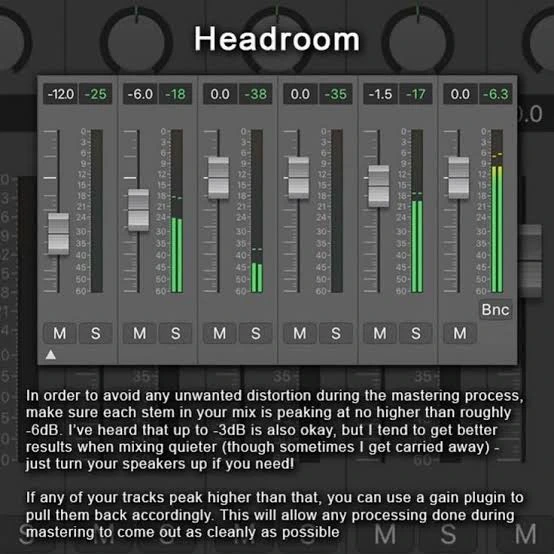
Leave Headroom
Avoid letting your master output reach 0 dB.
A good target before mastering is around -6 dB. This gives your mastering chain enough room to work without clipping.
Step 2: Clean Up Your Mix with EQ
EQ (Equalization) shapes the frequency balance of each track.
Logic Pro X’s Channel EQ is one of the best stock EQs available and should be one of the first plugins you learn.
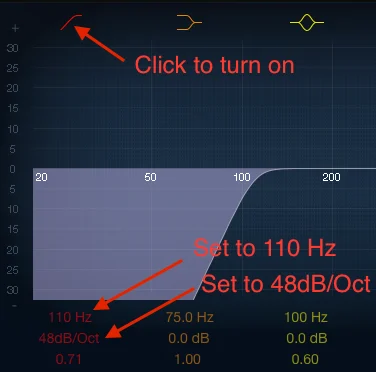
Remove Unnecessary Low Frequencies
Many instruments don’t need deep bass.
Use a high-pass filter on:
- Vocals
- Acoustic guitars
- Hi-hats
- Cymbals
- Synth pads
- Strings
This clears space for the kick drum and bass guitar.
Cut Before You Boost
Instead of boosting every frequency you like, first remove frequencies that make a sound muddy, harsh, or boxy. Small cuts often sound more natural than large boosts.
Avoid Frequency Clashes
If two instruments occupy the same frequency range, they can mask each other. For example, if the piano competes with the vocal, try reducing some of the piano’s midrange instead of making the vocal louder.
Step 3: Control Dynamics with Compression
After setting your volume levels and cleaning up frequencies with EQ, the next step is compression. Compression helps control the volume of a track by reducing the difference between loud and quiet parts. This creates a smoother and more consistent sound.
Logic Pro X includes several compressor models, each with its own character. For beginners, the default Platinum Digital compressor is an excellent choice because it is clean, transparent, and easy to use.
What Does a Compressor Do?
Imagine a singer whose voice is very quiet in one verse but suddenly becomes much louder in the chorus. Instead of manually adjusting the volume every few seconds, a compressor automatically reduces the louder parts, making the performance sound more even.
Compression is commonly used on:
- Lead vocals
- Bass guitar
- Kick drum
- Snare drum
- Acoustic guitar
- Drum bus
- Mix bus

Understanding Compressor Controls
| Setting | What It Does | Beginner Recommendation |
|---|---|---|
| Threshold | Determines when compression begins | Lower until gain reduction starts |
| Ratio | Controls how much compression is applied | 3:1 to 4:1 |
| Attack | Controls how quickly compression starts | 10–30 ms |
| Release | Determines how quickly compression stops | 50–150 ms |
| Makeup Gain | Restores lost volume | Adjust by ear |
Pro Tip
Don’t compress every track heavily. Too much compression removes energy and makes your song sound flat. Use only as much as needed to improve consistency.
Step 4: Create Width with Panning
Panning places instruments across the left and right speakers. A balanced stereo image makes your mix sound bigger and more professional.
Keep important elements in the center while spreading supporting instruments across the stereo field.

Example Panning Layout
| Instrument | Suggested Position |
|---|---|
| Kick | Center |
| Bass | Center |
| Lead Vocal | Center |
| Snare | Center |
| Hi-Hats | 15–30% Right |
| Rhythm Guitar | 40–60% Left |
| Piano | 20–30% Right |
| Backing Vocals | Left & Right |
| Pads | Wide Stereo |
Avoid placing every instrument in the center. Creating space helps listeners hear each part clearly.
Step 5: Add Depth with Reverb
Without reverb, recordings often sound dry and lifeless. Reverb simulates the reflections of sound in different spaces, making instruments feel like they belong together.
Logic Pro X includes two excellent reverb plugins:
- ChromaVerb
- Space Designer
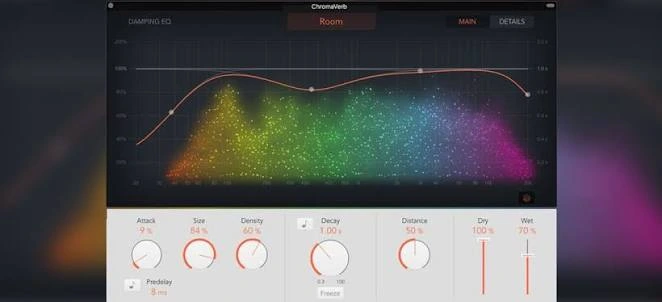
Choosing the Right Reverb
| Music Style | Recommended Reverb |
|---|---|
| Pop | Plate Reverb |
| Rock | Room Reverb |
| Acoustic | Hall Reverb |
| EDM | Large Hall |
| Podcast | Small Room |
Use Sends Instead of Inserts
Rather than adding a separate reverb plugin to every track, create one Aux Bus with reverb and send multiple tracks to it. This saves CPU power and creates a more natural, unified sound.
Step 6: Use Delay for Space and Movement
Delay repeats a sound after a short period, adding depth without making the mix overly wet.
Delay works especially well on:
- Lead vocals
- Guitar solos
- Synth leads
- Piano melodies
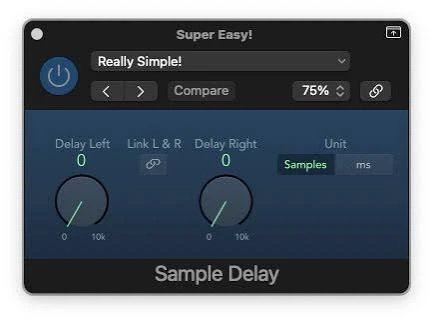
Popular Delay Times
| Delay Type | Best For |
|---|---|
| 1/8 Note | Fast pop vocals |
| 1/4 Note | Guitar solos |
| Dotted 1/8 | Modern pop and EDM |
| Ping Pong | Wide stereo effects |
Sync your delay to the song’s tempo for the cleanest results.
Step 7: Group Similar Tracks with Buses
As your projects grow, managing individual tracks becomes more difficult. Buses help you process multiple tracks together.
For example:
- Drum Bus
- Guitar Bus
- Vocal Bus
- Background Vocal Bus
Instead of adding the same compressor to every drum track, place one compressor on the Drum Bus.

Benefits include:
- Better consistency
- Easier control
- Lower CPU usage
- Faster workflow
Step 8: Bring Your Mix to Life with Group Similar Tracks with Buses
Automation allows you to change settings over time without editing audio directly.
You can automate:
- Volume
- Panning
- Reverb
- Delay
- EQ
- Filter sweeps
- Plugin parameters

Practical Examples
Increase the vocal volume slightly during a quiet verse.
Add more reverb during the final chorus.
Reduce background instruments while the lead vocal is singing.
These subtle changes help your song feel dynamic and emotional.
Step 9: Compare Your Mix with Reference Tracks
One of the fastest ways to improve your mixes is by comparing them with professionally produced songs in the same genre.
Listen for:
- Vocal level
- Bass balance
- Stereo width
- Overall brightness
- Loudness
- Drum punch
Don’t try to copy another song exactly. Instead, use it as a reference for balance and quality.
Step 10: Prepare Your Mix for Mastering
Before mastering, make sure your mix is clean.
Final Mixing Checklist
- No clipping
- Balanced instruments
- Clear vocals
- Controlled bass
- Stereo balance
- Automation complete
- Noise removed
- Around -6 dB of headroom on the master output
- Taking a few minutes to review your mix now can save hours later.

Mastering in Logic Pro X
Mastering is the final polish before you share your music with the world.
Many beginners think mastering is about making a song as loud as possible. In reality, good mastering is about improving clarity, balance, and consistency.
Step 1: Use Linear Phase EQ
Apply only small adjustments.
For example:
- Add a little brightness if the mix sounds dull.
- Reduce harsh high frequencies.
- Tighten the low end.
Subtle changes usually sound more natural than dramatic boosts or cuts.
Step 2: Apply Gentle Bus Compression
A small amount of compression on the stereo output can help glue the mix together.
Aim for light gain reduction so your song retains its natural dynamics.
Step 3: Increase Loudness with Adaptive Limiter
The Adaptive Limiter should usually be the final plugin in your mastering chain.
Its job is to raise the overall level while preventing clipping.
Increase the gain gradually and listen carefully for distortion or pumping. If the music starts to sound strained, back off slightly.
Step 4: Check the Final Master
Before exporting, listen to your song on different playback systems:
- Studio monitors
- Headphones
- Laptop speakers
- Car stereo
- Phone speaker
If the mix translates well across all of them, you’re ready to export.
Best Export Settings for Logic Pro X
Once you’re happy with your mix and master, it’s time to export your song. Choosing the right export settings ensures your music sounds great on streaming platforms, social media, or when shared with clients.
Logic Pro X makes exporting simple, but selecting the correct file format depends on how you plan to use your music.
Recommended Export Settings
| Purpose | File Format | Sample Rate | Bit Depth |
|---|---|---|---|
| Music Distribution | WAV | 44.1 kHz | 24-bit |
| Streaming Platforms | WAV | 44.1 kHz | 24-bit |
| YouTube Videos | WAV or AIFF | 48 kHz | 24-bit |
| Sharing with Friends | MP3 | 320 kbps | N/A |
| Podcast | MP3 | 192–320 kbps | N/A |
| Archive | WAV | 24-bit | Original Project Rate |

How to Export Your Song
- Save your project.
- Go to File > Bounce > Project or Section.
- Select the output format (WAV, AIFF, or MP3).
- Choose your preferred sample rate and bit depth.
- Enable Normalize: Off unless you specifically need it.
- Click Bounce and choose where to save your file.
For the highest quality, always keep a WAV version of your finished song, even if you also export an MP3 for sharing.
Common Mixing Mistakes to Avoid
Many beginners focus on adding more plugins instead of improving the basics. A clean mix often uses fewer plugins than you might expect.
1. Mixing Too Loud
Listening at very high volumes can make your ears tired and lead to poor decisions.
Solution: Mix at a comfortable listening level and take short breaks every hour.
2. Using Too Much EQ
Boosting every frequency usually creates a harsh and unnatural mix.
Better Approach: Make small adjustments and remove unwanted frequencies before boosting others.
3. Overusing Compression
Heavy compression removes the natural dynamics of your music.
Solution: Apply compression only where it improves consistency.
4. Adding Too Much Reverb
Large amounts of reverb can make vocals and instruments sound distant and muddy.
Solution: Use one or two shared reverb buses instead of separate reverbs on every track.
5. Ignoring Gain Staging
If tracks are recorded too hot, plugins have less room to work properly.
Maintain healthy signal levels throughout your project to avoid distortion.
6. Forgetting Automation
A static mix often feels lifeless.
Automating volume, effects, and panning adds movement and emotion to your song.
7. Mixing Without Reference Tracks
Professional songs can help you judge balance, tone, and loudness.
Choose reference tracks that match your genre and compare them throughout the mixing process.
Professional Mixing Workflow
Many experienced producers follow a simple workflow rather than jumping between random tasks.
| Stage | Main Goal |
|---|---|
| Organize Tracks | Keep the session clean |
| Balance Levels | Create a rough mix |
| EQ | Remove unwanted frequencies |
| Compression | Control dynamics |
| Panning | Build stereo width |
| Reverb & Delay | Add depth |
| Automation | Create movement |
| Reference Listening | Compare with professional songs |
| Mastering | Final polish |
| Export | Create release-ready files |
Following the same workflow on every project helps you work faster and achieve more consistent results.
Pro Tips for Better Mixes
Start With Great Recordings
A good recording is much easier to mix than a poor one. Spend time getting clean recordings before adding plugins.
Use Stock Plugins First
Logic Pro X includes professional-quality tools. Learn them well before investing in third-party plugins.
Keep Your Project Organized
Use folders, buses, and clear track names. A tidy session makes editing and mixing much easier.
Take Listening Breaks
Your ears become less accurate after long sessions. A short break can help you notice problems you missed before.
Save Multiple Versions
Before making major changes, save a new version of your project. This makes it easy to return to an earlier mix if needed.
Logic Pro X Mixing Cheat Sheet
| Task | Recommended Tool |
|---|---|
| Remove Mud | Channel EQ |
| Control Vocals | Compressor |
| Add Space | ChromaVerb |
| Create Echo | Stereo Delay |
| Stereo Width | Stereo Spread |
| Master Loudness | Adaptive Limiter |
| Volume Changes | Automation |
| Group Tracks | Bus Channels |
FAQS
How do I mix and master in Logic Pro X?
Start by balancing volume levels, then use EQ, compression, panning, reverb, delay, and automation. Once your mix is finished, master the song using gentle EQ, bus compression, and the Adaptive Limiter before exporting.
Can I mix professionally using only Logic Pro X?
Yes. Logic Pro X includes high-quality built-in plugins that are capable of producing professional mixes without additional software.
Do I need third-party plugins?
No. While premium plugins offer extra features, Logic Pro X’s stock plugins are powerful enough for most music production tasks.
Should I mix and master in the same project?
Many producers do, while others export the final mix into a separate mastering project. Both approaches can produce excellent results.
What is the best EQ plugin in Logic Pro X?
Channel EQ is the most commonly used built-in equalizer. It provides precise frequency control and works well for nearly every mixing situation.
Which compressor should I use?
The Platinum Digital model is an excellent starting point because it offers clean and transparent compression suitable for most genres.
How loud should my final master be?
Aim for a balanced master that sounds clear without distortion. Avoid pushing the limiter so hard that the music loses its dynamics.
What file format should I export?
Export a 24-bit WAV file for the highest quality. You can also create a 320 kbps MP3 for easy sharing.
How long does it take to learn mixing and mastering?
You can learn the basics within a few weeks, but developing professional skills takes consistent practice and critical listening.
Is Logic Pro X good for beginners?
Yes. Logic Pro X offers a clean interface, powerful built-in tools, and an excellent balance of ease of use and advanced features, making it suitable for both beginners and experienced producers.
Final Thoughts
Learning how to mix master in Logic Pro X is one of the most valuable skills you can develop as a music producer. A great mix allows every instrument and vocal to shine, while a thoughtful master ensures your music sounds polished across headphones, speakers, cars, and streaming platforms.
Remember that professional results don’t come from using the most plugins—they come from making smart decisions. Focus on clean recordings, balanced levels, careful EQ, gentle compression, tasteful effects, and subtle mastering. As your experience grows, you’ll become faster, more confident, and better at recognizing what each song needs.
Logic Pro X gives you all the essential tools to create release-ready music. Practice regularly, compare your work with professional reference tracks, and continue refining your workflow. Every project you complete will help you build stronger mixing and mastering skills.
Related Articles
- Logic Pro Recording Delay: Causes and Fixes
- How to Export Logic Pro Projects as MP3
- Logic Pro Plugins Not Showing? Here’s How to Fix It
- Logic Pro vs GarageBand: Which DAW Is Right for You?
- Logic Pro vs Cubase: A Complete Comparison
- Best MacBook for Logic Pro X
- Logic Pro Free Trial: Everything You Need to Know
- Logic Pro Running Slow? Easy Ways to Improve Performance
 Reliable Knowledge, Fresh Perspectives